When it comes to building or renovating a bathroom, selecting the right materials is crucial, especially in the shower area. One of the most reliable options is the Hardie Backer Board, known for its durability, water resistance, and ease of installation. This comprehensive guide explores everything you need to know about using Hardie Backer Board for shower walls, ensuring you make an informed decision for your next project.
Understanding Hardie Backer Board
To make the most of the Hardie Backer Board, it’s essential to understand its composition, benefits, and how it compares to other materials. This knowledge will help you appreciate why it’s a superior choice for shower walls.
What is Hardie Backer Board?
Hardie Backer Board is a type of cement board commonly used in wet areas such as bathrooms and kitchens. Made by James Hardie, it is composed of cement and sand, reinforced with fiberglass mesh, making it resistant to moisture and mold. This makes it an excellent choice for areas that are frequently exposed to water, like shower walls.
Benefits of Using Hardie Backer Board
Using Hardie Backer Board in shower walls offers several advantages:
- Water Resistance: Unlike drywall, it won’t deteriorate when exposed to moisture, providing a reliable surface for your tiles.
- Mold Resistance: Its composition prevents mold growth, ensuring a healthier environment for you and your family.
- Durability: It provides a solid base for tiles, preventing cracking and movement over time, which can compromise the integrity of your shower.
- Ease of Installation: It can be cut and installed with basic tools, making it accessible for DIY enthusiasts and professionals alike, simplifying the renovation process.
Comparing Hardie Backer Board to Other Materials
Understanding how Hardie Backer Board compares to other materials like drywall, green board, and other cement boards can help in making an informed choice. While drywall is cost-effective, it lacks water resistance. Green board offers better moisture resistance but still falls short compared to cement boards. Other cement boards might be heavier or harder to cut, making Hardie Backer Board a balanced option for many. This comparison highlights why the Hardie Backer Board is often the preferred choice for wet areas.
Installation Process of Hardie Backer Board
Proper installation of the Hardie Backer Board is key to ensuring its effectiveness and longevity in your shower. This section covers the steps needed to prepare, cut, fit, and secure the board, as well as sealing joints and seams.
Preparing the Surface
Before installing the Hardie Backer Board, it’s essential to prepare the surface properly. Ensure that the wall studs are properly spaced and securely fastened. Any existing drywall or old tiles should be removed, and the area should be cleaned to provide a solid foundation. This preparation is crucial for a smooth installation process.
Cutting and Fitting Hardie Backer Board
Cutting Hardie Backer Board requires a few tools, such as a carbide-tipped scoring knife, a circular saw with a masonry blade, or a jigsaw. Measure the area accurately and mark the cuts on the board. Cut along the marked lines and fit the board to the wall, leaving a small gap between the board and the floor to allow for expansion. Accurate cutting and fitting ensure a snug fit, reducing potential issues down the line.
Securing the Board to the Wall
Use corrosion-resistant screws or nails to secure the Hardie Backer Board to the wall studs. Place screws approximately 8 inches apart, ensuring that they are flush with the surface of the board. It’s also advisable to use a thin-set mortar between the studs and the board for added stability. Proper securing prevents movement and ensures a sturdy base for tiling.
Sealing Joints and Seams
Once the boards are secured, it’s crucial to seal the joints and seams to prevent water penetration. Use an alkali-resistant fiberglass tape and apply thin-set mortar over the tape. Smooth out the mortar to ensure a flat surface for tiling. Sealing joints properly is essential to prevent water damage and maintain the integrity of your shower walls.
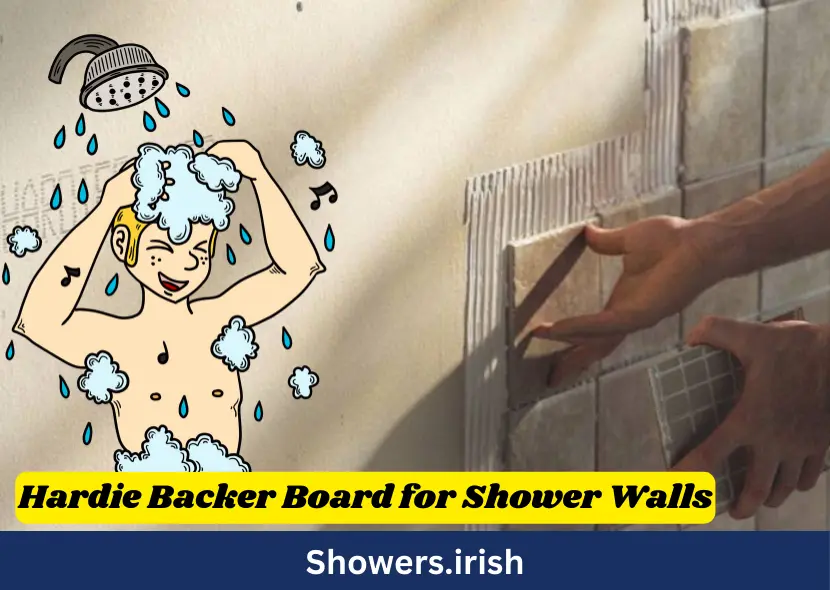
Tiling Over Hardie Backer Board
After successfully installing the Hardie Backer Board, the next step is tiling. This section provides detailed guidance on choosing the right tile, applying thin-set mortar, installing tiles, and grouting and sealing.
Choosing the Right Tile
Selecting the right tile is essential for the overall look and functionality of your shower. Ceramic and porcelain tiles are popular choices due to their water resistance and durability. Ensure that the tiles you choose are rated for use in wet areas. The right tile enhances both the aesthetic appeal and the practicality of your shower.
Applying Thinset Mortar
Thinset mortar is used to adhere the tiles to the Hardie Backer Board. Mix the mortar according to the manufacturer’s instructions and apply it to the wall using a notched trowel. Spread the mortar evenly, covering a small section at a time to prevent it from drying out. Proper application of thin-set mortar is critical for the tiles to bond securely.
Installing the Tiles
Start tiling from the bottom of the wall and work your way up. Press each tile firmly into the thin-set mortar, using tile spacers to ensure even spacing. Check the tiles frequently to ensure they are level and properly aligned. Careful installation ensures a professional finish and minimizes the risk of tile movement.
Grouting and Sealing
Once the tiles are set, remove the spacers and apply grout to the spaces between the tiles. Use a rubber float to spread the grout, pressing it into the gaps. Wipe away excess grout with a damp sponge and allow it to dry. Finally, apply a grout sealer to protect against moisture and stains. Proper grouting and sealing extend the life of your tiling and enhance its appearance.
Maintenance and Care of Hardie Backer Board
Maintaining your shower walls properly ensures they remain in excellent condition for years to come. This section covers routine cleaning, addressing repairs, and preventive measures to protect your investment.

Routine Cleaning
Maintaining a clean shower is essential to prolong the life of your tiles and Hardie Backer Board. Use a mild cleaner and a soft brush to clean the tiles and grout regularly. Avoid using harsh chemicals that could damage the grout or tiles. Routine cleaning prevents buildup and keeps your shower looking fresh.
Addressing Repairs
Over time, you may need to address minor repairs, such as replacing cracked tiles or reapplying grout. For small repairs, you can often handle them yourself with basic tools and materials. For more extensive damage, consider consulting a professional. Timely repairs prevent minor issues from escalating into major problems.
Preventive Measures
To prevent issues such as mold growth or water damage, ensure proper ventilation in your bathroom. Use a dehumidifier or exhaust fan to reduce moisture levels. Regularly inspect the grout and caulk for signs of wear and replace them as needed. Preventive measures help maintain a healthy and functional shower environment.
Conclusion
Using Hardie Backer Board for shower walls is an excellent choice for its durability, water resistance, and ease of installation. By understanding the material, following the correct installation process, and maintaining your shower properly, you can enjoy a beautiful and functional bathroom for years to come. Whether you’re a DIY enthusiast or a professional, this guide provides the essential knowledge to ensure a successful project.
Frequently Asked Questions:
Q1: Can Hardie Backer Board be used for floors and walls?
Yes, the Hardie Backer Board can be used for both floors and walls. Its durability and moisture resistance make it suitable for various applications in wet areas, including shower walls and bathroom floors.
Q2: Do I need to waterproof the Hardie Backer Board before tiling?
While Hardie Backer Board is water-resistant, applying a waterproof membrane before tiling adds an extra layer of protection. This step is highly recommended, especially in high-moisture areas like showers.
Q3: What is the best way to cut the Hardie Backer Board?
The best way to cut Hardie Backer Board is using a carbide-tipped scoring knife for straight cuts or a circular saw with a masonry blade for more precise or intricate cuts. Always wear protective gear to avoid inhaling dust.
Q4: How often should I reseal the grout in my shower?
Grout should typically be resealed every six months to a year, depending on your bathroom’s usage and moisture levels. Regular resealing helps prevent water penetration and maintains the integrity of your shower walls.
Q5: Can I paint the Hardie Backer Board?
Hardie Backer Board is designed to be tiled over rather than painted. Painting is not recommended as the paint may not adhere properly or provide the necessary moisture protection.
Discover the ultimate in-shower panel luxury with Homebase Shower Panels! 🚿✨ Transform your bathroom into a spa-like oasis with sleek designs and innovative features. From modern aesthetics to cutting-edge technology, these panels redefine your daily shower experience. Indulge in multi-functionality with options like rainfall showers, massage jets, and handheld sprays, all conveniently integrated into one stylish unit.
Whether you’re renovating or upgrading, Homebase Shower Panels offer unparalleled convenience and elegance. Imagine stepping into your shower and instantly feeling the stress melt away as water cascades from every angle, tailored to your preferences. These panels are not just about functionality but also about elevating your bathroom decor.
Explore the link to discover more about how Homebase Shower Panels can enhance your home spa experience. Treat yourself to luxury and convenience every day! 🛁💫
Credit Website: www.ireland.ie/