
Setting up a shower area can transform your bathroom experience from mundane to luxurious. Whether you’re upgrading your current setup or installing a new one, understanding how to fit a shower head, cubicle, and screen is essential for a flawless finish. This guide will walk you through each step, ensuring your DIY project is smooth and successful.
Choosing the Right Shower Head
Selecting the perfect shower head is the first step in creating a comfortable and functional shower experience. The right choice can enhance water flow, reduce water usage, and improve overall satisfaction. Here’s how to make an informed decision.

Types of Shower Heads
Understanding the different types of shower heads available can help you choose one that suits your needs:
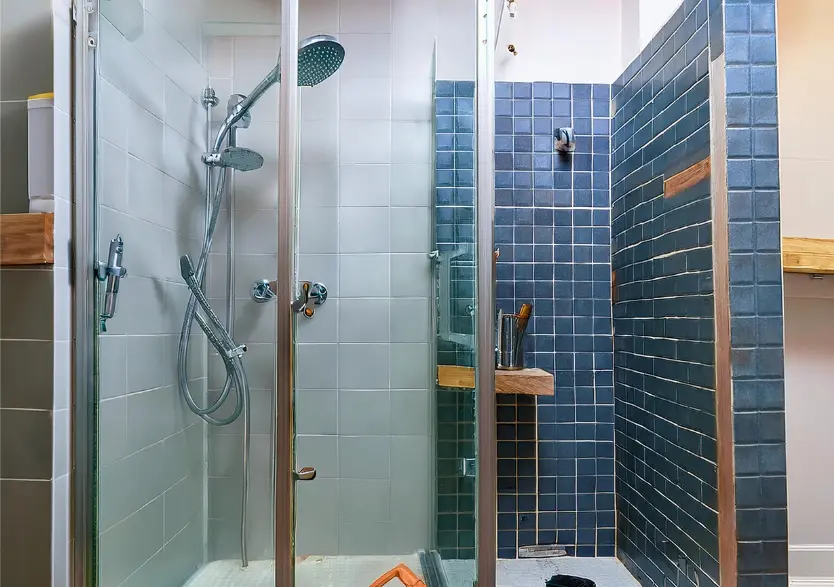
- Fixed Shower Heads: Attached directly to the wall, fixed shower heads are simple and reliable. They provide consistent water flow but lack flexibility.
- Handheld Shower Heads: These come with a hose and can be detached from the wall mount. They offer flexibility and are ideal for tasks like rinsing off or cleaning the shower area.
- Rainfall Shower Heads: These provide a wide, gentle stream of water, simulating the feeling of standing in the rain. They are typically larger and mounted on the ceiling or a high wall.
Shower Head Features
When choosing a shower head, consider the following features:
- Flow Rate: Measured in gallons per minute (GPM), the flow rate affects water pressure and conservation. Look for models with a flow rate of 2.5 GPM or lower to save water without compromising performance.
- Adjustability: Some shower heads offer multiple spray settings. This feature allows you to switch between different types of sprays, such as massage or mist, for a customizable experience.
- Water Filtration: For those with hard water, a shower head with a built-in filter can reduce mineral buildup and improve water quality.
Installation Tips
Installing a shower head is a straightforward process if you follow these tips:
- Turn Off Water Supply: Before beginning, ensure that the water supply to the shower is turned off to avoid leaks.
- Use Plumber’s Tape: Wrap plumber’s tape around the threads of the pipe to ensure a watertight seal and prevent leaks.
- Align Properly: Make sure the shower head is aligned correctly before tightening it. A misaligned head can lead to uneven water flow or drips.
Fitting a Shower Cubicle
A shower cubicle can create a dedicated space for showering, improving your bathroom’s functionality and aesthetics. Here’s how to fit one correctly.
Measuring Your Space
Before purchasing a shower cubicle, accurate measurements are crucial:
- Width and Depth: Measure the area where the cubicle will be installed to ensure it fits properly. Allow some clearance for door openings and movement.
- Height: Check the height of the space, especially if you’re installing a cubicle with a built-in ceiling or an overhead shower head.
Choosing the Right Cubicle
Different types of shower cubicles are available, each offering various features:
- Corner Cubicles: Ideal for smaller bathrooms, these cubicles fit snugly into a corner and often have sliding doors to save space.
- Quadrant Cubicles: With a curved front, quadrant cubicles are space-efficient and can fit in tight corners.
- Walk-In Cubicles: These offer a more open design with minimal barriers, providing easy access and a modern look.
Installation Process
Follow these steps for a successful installation:
- Assemble the Frame: Most cubicles come in modular sections. Assemble the frame according to the manufacturer’s instructions before fitting it in place.
- Seal Edges: Apply silicone sealant around the edges to prevent water leakage and mold growth.
- Secure the Panels: Attach the glass or acrylic panels to the frame securely, ensuring they are level and properly aligned.
Installing a Shower Screen
A shower screen not only prevents water from splashing but also enhances the visual appeal of your shower area. Here’s how to install one correctly.
Types of Shower Screens
Choosing the right shower screen depends on your bathroom layout and personal preferences:
- Sliding Screens: These are space-saving and ideal for smaller bathrooms. They slide open to allow access and close to keep water in.
- Bi-Fold Screens: These fold inwards to save space, making them a good choice for compact bathrooms.
- Fixed Panels: Fixed panels are stationary and offer a sleek, minimalist look. They are usually paired with a fixed shower head.
Installation Considerations
Here’s what you need to consider for a successful installation:
- Check Level and Plumb: Use a spirit level to ensure the screen is perfectly vertical and horizontal. This prevents water from leaking through gaps.
- Install Mounting Brackets: Securely attach the mounting brackets to the wall. Ensure they are aligned with the screen’s hinges or slides.
- Apply Sealant: To prevent leaks, apply silicone sealant around the edges of the screen where it meets the wall and the shower tray.
Maintenance and Care
Maintaining your shower setup ensures longevity and consistent performance. Regular cleaning and minor repairs can prevent larger issues down the line.

Cleaning Tips
- Use Non-Abrasive Cleaners: To avoid scratching surfaces, use mild, non-abrasive cleaners for the shower head, cubicle, and screen.
- Remove Soap Scum: Regularly clean soap scum and mineral deposits to prevent buildup and maintain clear, sparkling surfaces.
Regular Checks
- Inspect for Leaks: Periodically check for leaks around the shower head, cubicle seams, and screen edges. Address any issues promptly to prevent water damage.
- Tighten Fixtures: Ensure all fixtures are tight and secure. Loose fittings can lead to water damage or functionality issues.
Conclusion
Installing a shower head, cubicle, and screen may seem daunting, but with the right tools and knowledge, it can be a rewarding DIY project. By carefully selecting and installing each component, you can create a shower area that is both functional and stylish.
Whether you’re updating an old setup or fitting a new one, follow these guidelines to ensure a perfect fit and a satisfying shower experience. For further reading, explore guides on maintaining your new shower setup or tips for choosing additional bathroom fixtures to enhance your space even further. Happy DIY-ing!
Frequently Asked Questions (FAQs)
1. What type of shower head is best for water conservation?
The best shower heads for water conservation are those with a flow rate of 2.5 gallons per minute (GPM) or lower. Look for models that are labeled as water-saving or low-flow, which can help reduce water usage without sacrificing performance.
2. How do I measure the space for a shower cubicle installation?
To measure the space for a shower cubicle, check the width, depth, and height of the area where it will be installed. Ensure there is enough clearance for door openings and movement, and take precise measurements to avoid issues with fitting the cubicle.
3. What is the difference between a fixed shower head and a handheld shower head?
A fixed shower head is mounted directly to the wall and provides a stationary water flow. A handheld shower head is attached to a hose, allowing you to move it around and target specific areas, making it more versatile for tasks like rinsing or cleaning.
4. How can I prevent leaks when installing a shower screen?
To prevent leaks when installing a shower screen, ensure that it is level and properly aligned. Apply silicone sealant around the edges where the screen meets the wall and shower tray, and regularly check for any gaps or signs of water leakage.
5. What maintenance is required for a shower cubicle?
Regular maintenance for a shower cubicle includes cleaning the surfaces with non-abrasive cleaners, removing soap scum and mineral deposits, inspecting for leaks, and tightening any loose fixtures. This helps keep the cubicle in good condition and prevents water damage.
If you’re considering updating your shower area, installing new shower walls and a Mira electric shower can be a game-changer. The process involves careful preparation and precise installation to ensure a seamless and functional result. For a comprehensive guide on installing shower walls and grout, as well as fitting a Mira electric shower, check out this detailed resource:
Showers Irish: Install Shower Walls, Grout, and Mira Electric Shower.
This guide covers everything from selecting the right materials to step-by-step instructions on the installation process. Whether you’re tackling a DIY project or seeking professional advice, this link provides valuable insights and tips to help you achieve a perfect shower setup. For a smooth and successful installation, ensure you follow each step carefully and consult additional resources if needed.
Credit Website: www.ireland.ie/