
Installing a walk-in shower is a popular home improvement project that enhances the functionality and aesthetics of a bathroom. Whether you’re renovating your entire bathroom or simply upgrading your shower, this guide will walk you through the essential steps, from preparing the space with cement board to installing sleek glass panels. In this article, we’ll cover everything you need to know to complete this project successfully.
Preparing Your Shower Space
Before diving into the installation of a walk-in shower, it’s crucial to properly prepare the space. This preparation sets the foundation for a durable and water-resistant shower area, ensuring longevity and preventing issues like mold and water damage.
Removing the Old Shower
The first step in preparing your shower space is to remove the existing shower or bathtub. This involves disconnecting plumbing fixtures, removing tiles, and tearing down any existing wall materials. Make sure to turn off the water supply before starting and have a plan for debris removal. Taking care during this phase can save you time and effort later.
Assessing and Repairing the Subfloor
After removing the old shower, inspect the subfloor for any damage. Water damage is common, especially if the previous shower was not properly waterproofed. If you find any rot or mold, replace the affected areas with new plywood or other suitable subfloor material. A solid, level subfloor is essential for a successful shower installation.
Installing a Shower Pan
Once the subfloor is secure, the next step is to install a shower pan. The shower pan is a critical component that directs water towards the drain, preventing leaks. Choose a pan that fits the dimensions of your shower space, and follow the manufacturer’s instructions for installation. Proper installation of the shower pan is crucial for avoiding water-related issues in the future.
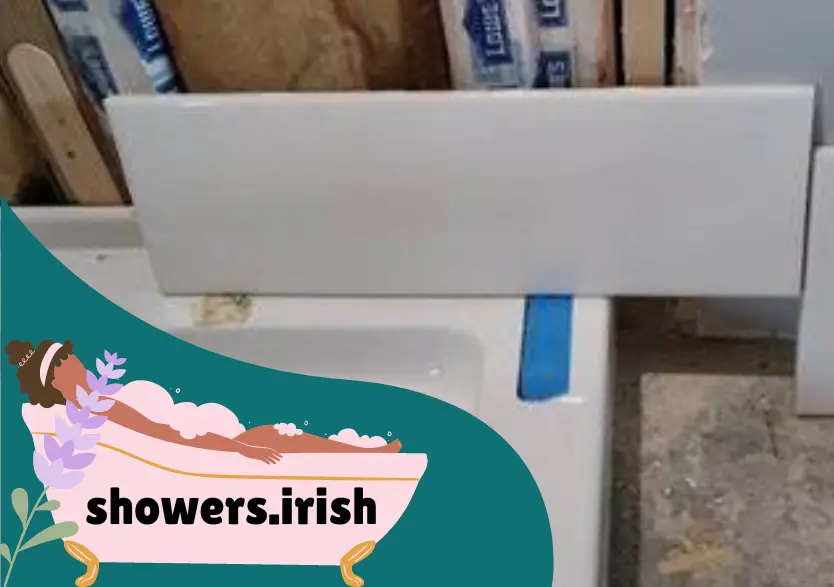
Installing Cement Board in a Shower
Cement board is a popular choice for shower walls because of its moisture resistance and durability. Unlike drywall, cement board won’t deteriorate when exposed to water, making it an ideal substrate for tile installation in wet areas.
Choosing the Right Cement Board
Not all cement boards are created equal, so it’s important to choose one that is specifically designed for use in showers. Brands like HardieBacker and Durock are well-known for their quality. These boards are available in various thicknesses, typically 1/4″ or 1/2″. The thicker the board, the more durable it will be, but it may also be more challenging to cut and handle.
Cutting and Installing the Cement Board
After selecting the right cement board, the next step is cutting it to fit your shower walls. Use a utility knife to score the board, then snap it along the line. Attach the cement board to the wall studs using galvanized screws, ensuring the screws are flush with the board’s surface. Be sure to leave a small gap between the boards and the shower pan, which will be filled with caulk to allow for expansion.
Taping and Sealing the Joints
Once the cement board is installed, it’s essential to tape and seal the joints. Use fiberglass mesh tape to cover the seams between the boards. Then, apply a thin layer of thin-set mortar over the tape, smoothing it out with a trowel. This process ensures a seamless, water-resistant surface, ready for tiling.
Waterproofing the Cement Board
To further protect your shower walls from moisture, apply a waterproofing membrane over the cement board. Products like RedGard or Hydro Ban are commonly used for this purpose. Roll or brush the membrane onto the cement board, ensuring full coverage, especially in the corners and around the edges. Allow the membrane to dry completely before proceeding with tile installation.
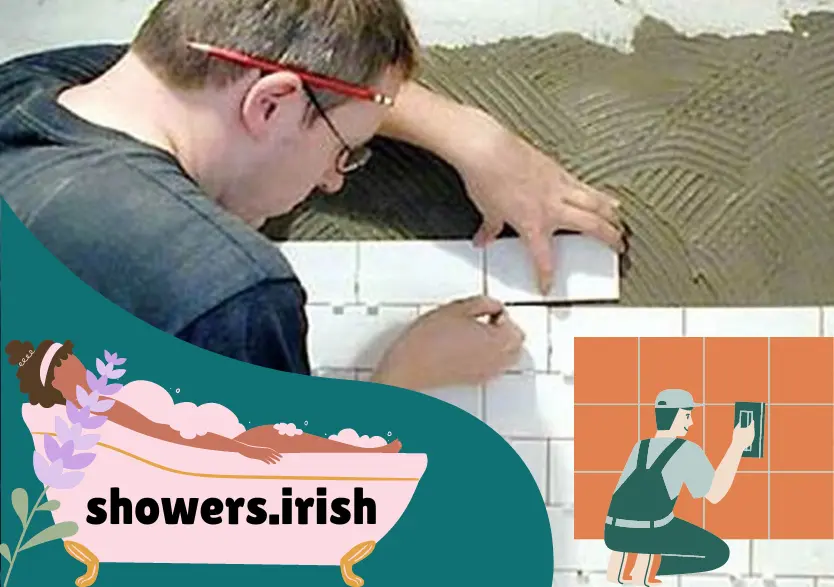
Tiling the Shower Walls
With the cement board installed and waterproofed, you can now move on to tiling the shower walls. Tile is a popular choice for shower walls due to its durability, water resistance, and variety of design options.
Selecting the Right Tile
Choosing the right tile is an important step in achieving the desired look and function for your shower. Porcelain and ceramic tiles are popular choices for showers because they are water-resistant and available in a wide range of styles and colors. Consider using smaller tiles on the shower floor for better traction and larger tiles on the walls to minimize grout lines.
Planning the Tile Layout
Before applying any adhesive, plan the layout of your tiles. Start by finding the center of each wall and marking it with a chalk line. This will help you align the tiles and ensure a symmetrical layout. Dry-fit the tiles on the floor to visualize the pattern and make any necessary adjustments.
Applying Tile Adhesive
Once you’re satisfied with the layout, it’s time to apply the tile adhesive. Use a notched trowel to spread the adhesive on the wall, starting at the bottom and working your way up. Press each tile firmly into the adhesive, using spacers to maintain even grout lines. Work in small sections to prevent the adhesive from drying out before the tiles are set.
Grouting and Sealing the Tiles
After the tiles have set, usually within 24 hours, remove the spacers and prepare to apply grout. Mix the grout according to the manufacturer’s instructions and use a rubber float to press it into the gaps between the tiles. Wipe away excess grout with a damp sponge, then allow it to cure. Finally, apply a grout sealer to protect the grout from moisture and stains.
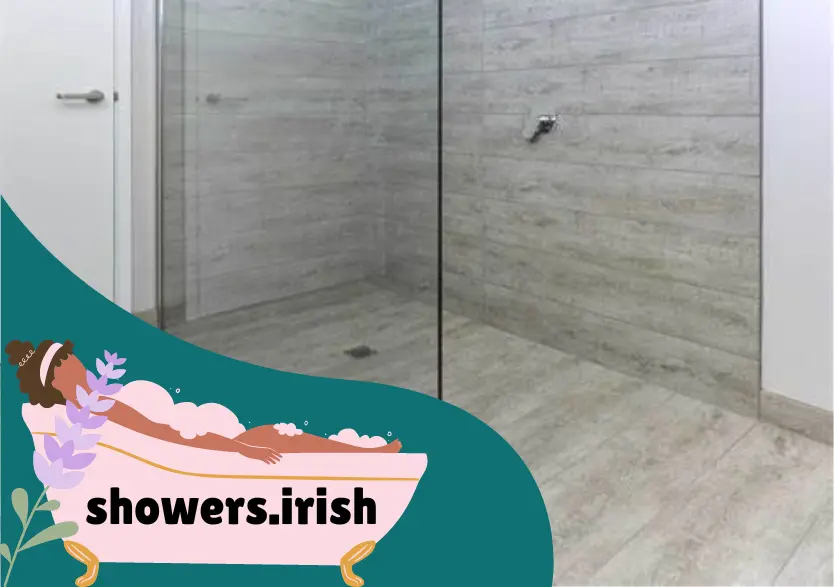
Installing Walk-In Shower Glass Panels
The final step in your walk-in shower project is installing the glass panels. Glass panels not only enhance the modern aesthetic of your bathroom but also create a seamless and open feel, making the space appear larger.
Choosing the Right Glass Panels
When selecting glass panels for your walk-in shower, consider factors like thickness, clarity, and style. Thicker glass panels (3/8″ or 1/2″) are more durable and provide a premium feel. You can choose between clear, frosted, or patterned glass depending on your privacy needs and design preferences.
Measuring and Preparing for Installation
Accurate measurements are crucial when ordering custom glass panels. Measure the width and height of the shower opening and ensure that the walls are plumb. If they’re not, the glass panels may need to be cut at an angle. Before installation, clean the shower area thoroughly to remove any dust or debris.
Installing the Glass Panels
Installation typically involves securing metal tracks or brackets to the shower walls and floor. The glass panels are then inserted into these tracks and secured with screws or clips. It’s advisable to have a professional help with this step, as glass panels can be heavy and challenging to handle.
Sealing the Edges
After the glass panels are in place, apply a clear silicone sealant along the edges where the glass meets the wall and shower pan. This will prevent water from leaking out of the shower area. Allow the sealant to cure according to the manufacturer’s instructions before using the shower.
Conclusion
Installing a walk-in shower from cement board to glass panels is a rewarding project that can significantly enhance your bathroom’s functionality and style. By following these steps, you ensure that your shower is not only beautiful but also durable and water-resistant. Remember to take your time with each phase of the installation, and don’t hesitate to seek professional assistance for more challenging tasks, such as installing the glass panels.
With proper planning and execution, your new walk-in shower will be a luxurious addition to your home, offering both comfort and a modern aesthetic. Whether you’re a seasoned DIYer or a first-time renovator, this guide provides the comprehensive information you need to successfully complete your walk-in shower project.
Frequently Asked Questions (FAQs)
1. What is the purpose of using cement board in a shower installation?
Cement board is used in shower installations because it is highly resistant to moisture and provides a durable surface for tile installation. Unlike drywall, cement board won’t deteriorate when exposed to water, making it an essential component for creating a water-resistant shower area.
2. How do I waterproof cement board before tiling?
To waterproof cement board, apply a waterproofing membrane like RedGard or Hydro Ban. This membrane should be rolled or brushed onto the cement board, with special attention to corners and edges, ensuring complete coverage to prevent moisture penetration.
3. Can I install shower tiles directly onto the cement board?
Yes, once the cement board is installed and waterproofed, you can directly apply tile adhesive and set your tiles. Ensure that the cement board is properly secured and seams are taped and sealed before tiling.
4. What factors should I consider when choosing glass panels for my walk-in shower?
When choosing glass panels, consider the thickness of the glass (typically 3/8″ or 1/2″), the level of clarity (clear, frosted, or patterned), and the style that matches your bathroom’s design. Additionally, ensure accurate measurements for a proper fit.
5. Is it necessary to hire a professional to install glass panels in a walk-in shower?
While it’s possible to install glass panels yourself, it’s often recommended to hire a professional due to the weight and fragility of the glass. Proper installation is crucial to ensure safety, avoid leaks, and achieve a seamless look.
If you’re planning to install a walk-in shower, understanding the importance of caulking, grouting, and fitting is essential to ensure a durable and water-resistant finish. While installing cement board and glass panels are critical steps, sealing and grouting the tiles are equally important to prevent water damage and mold growth. Properly applying caulk and grout not only enhances the appearance of your shower but also adds to its longevity. If you want a detailed guide on how to caulk, grout, and fit your shower, check out this comprehensive tutorial:
How to Caulk, Grout, and Fit a Shower.
This resource provides step-by-step instructions to help you achieve a professional-quality finish in your bathroom renovation project. Whether you’re a DIY enthusiast or a first-time renovator, this guide will help you master the essential techniques for a flawless shower installation.
Image by freepik