Building a walk-in shower from scratch can be a rewarding project, transforming your bathroom into a luxurious and functional space. This guide will take you through the entire process, from planning and design to installation and finishing touches. Whether you’re a seasoned DIY enthusiast or a beginner, you’ll find valuable information and tips to help you achieve a stunning walk-in shower.
Understanding the Basics of a Walk-In Shower
Before diving into the construction details, it’s essential to understand what a walk-in shower is and why it’s a popular choice for modern bathrooms.
What is a Walk-In Shower?
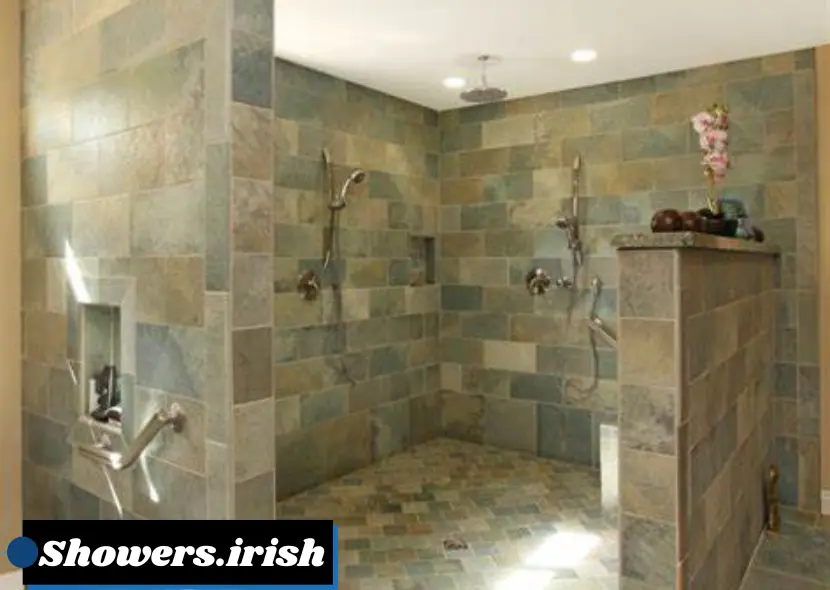
A walk-in shower is a type of shower that features an open design, eliminating the need for doors or a traditional bathtub. It often includes a barrier-free entry, making it accessible and visually appealing. Walk-in showers can be customized with various features such as built-in benches, multiple showerheads, and stylish tile work.
Benefits of a Walk-In Shower
Walk-in showers offer several advantages:
- Accessibility: Easy entry and exit, ideal for those with mobility issues.
- Aesthetic Appeal: Sleek and modern design that enhances the look of your bathroom.
- Easy Maintenance: Fewer seams and corners mean less cleaning.
- Increased Property Value: Adds luxury and functionality to your home.
Planning Your Walk-In Shower
Proper planning is crucial for a successful walk-in shower installation. This phase includes selecting materials, designing the layout, and preparing your space.
Designing the Layout
Begin by determining the size and shape of your walk-in shower. Consider the following:
- Space Availability: Measure your bathroom to ensure the shower will fit comfortably.
- Showerhead Placement: Decide on the location for your showerhead and any additional fixtures.
- Drain Location: Plan where the drain will go to ensure proper water flow and drainage.
Selecting Materials
Choose materials that are both functional and stylish. Common options include:
- Tile: Offers a wide range of colors, patterns, and textures.
- Glass: Provides a sleek, modern look and makes the space feel larger.
- Stone: Durable and luxurious, but requires regular maintenance.
Budgeting and Cost Estimation
Estimate the cost of materials, labor, and any additional features you want to include. Be sure to budget for unexpected expenses and consider hiring professionals for complex tasks.
Preparing the Space for Installation
Preparation is key to a successful installation. This phase involves removing old fixtures, ensuring proper waterproofing, and setting up for the new shower.
Removing Existing Fixtures
If you’re remodeling an existing bathroom, start by removing any old fixtures, such as a bathtub or outdated shower unit. This may involve:
- Shutting Off Water Supply: Ensure the water supply is turned off before removal.
- Demolishing Old Structures: Carefully remove tiles, walls, and other components.
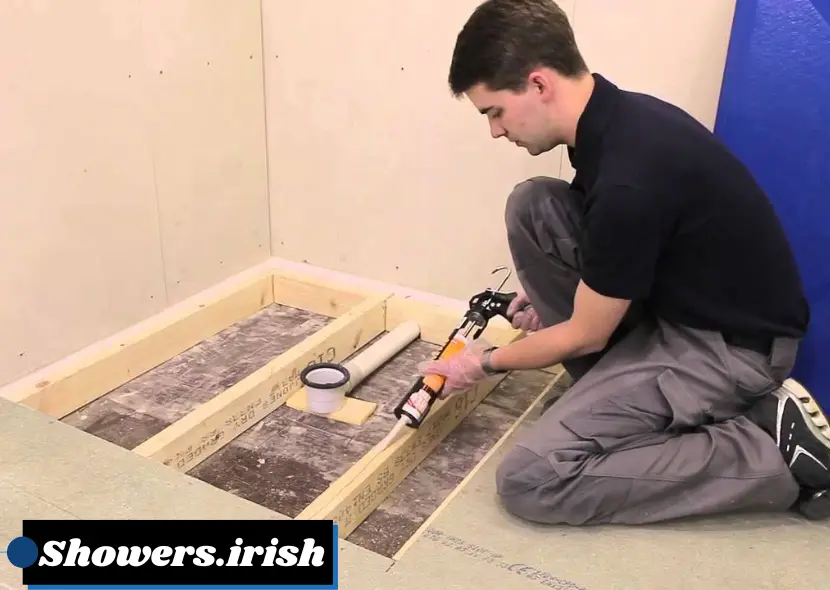
Ensuring Proper Waterproofing
Waterproofing is crucial to prevent leaks and water damage. Apply a waterproof membrane or sealant to the shower area, including the floor and walls. Consider using:
- Waterproof Backer Board: Provides a solid foundation and prevents moisture buildup.
- Waterproofing Membranes: Apply these to the walls and floor to create a watertight seal.
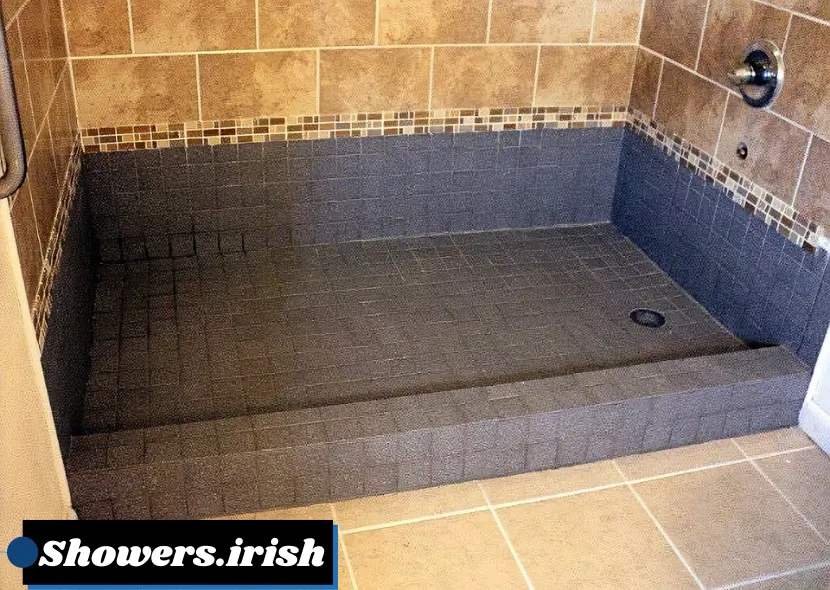
Setting Up the Shower Base and Drain
Install the shower base and drain according to your design. Make sure the base is level and securely attached to the floor. Proper placement of the drain is essential for efficient water flow and drainage.
Installing Your Walk-In Shower
With preparation complete, you can now move on to the installation process. This includes assembling the shower components, tiling, and adding finishing touches.
Assembling the Shower Components
Install the main components of your shower, including:
- Showerhead and Controls: Attach these to the wall or ceiling as per your design.
- Glass Panels or Doors: If using glass, ensure it is securely mounted and sealed to prevent leaks.
- Shower Bench: If you opted for a built-in bench, install it according to the manufacturer’s instructions.
Tiling and Grouting
Tiling is a crucial step in achieving a polished look. Follow these steps:
- Tile Installation: Begin with the walls, using a tile adhesive and spacers to ensure even placement.
- Grouting: Once the adhesive has dried, apply grout between the tiles and wipe off excess.
Adding Finishing Touches
Complete your walk-in shower with finishing touches such as:
- Caulking: Seal any gaps or joints to prevent water leakage.
- Shelving: Add built-in shelves or corner caddies for storage.
- Lighting: Install appropriate lighting to enhance the shower area.
Maintaining Your Walk-In Shower
Proper maintenance will ensure the longevity and appearance of your walk-in shower. Follow these tips for upkeep:

Regular Cleaning
Clean your walk-in shower regularly to prevent mold and mildew buildup. Use:
- Non-Abrasive Cleaners: Avoid harsh chemicals that can damage surfaces.
- Soft Cloths: Use microfiber cloths to clean tiles and glass.
Checking for Leaks
Periodically inspect your shower for any signs of leaks or water damage. Address any issues promptly to avoid more significant problems.
Re-Sealing and Repairs
Over time, the grout and caulking may need to be replaced. Re-seal grout lines and caulk joints as needed to maintain a watertight seal.
Conclusion
Building a walk-in shower from scratch involves careful planning, precise installation, and ongoing maintenance. By understanding the basics, preparing your space, and following the installation steps outlined in this guide, you can create a stylish and functional shower that enhances your bathroom.
For further reading or inspiration, consider exploring additional design ideas and advanced features for walk-in showers. If you have any questions or need more detailed guidance, don’t hesitate to reach out to professionals or consult additional resources. Happy building!
Frequently Asked Questions (FAQs)
What is the ideal size for a walk-in shower?
The ideal size for a walk-in shower typically ranges from 36×36 inches to 60×60 inches, but it depends on your bathroom space and personal preferences. Ensure there’s enough room for comfortable movement and installation of any additional features like benches or multiple showerheads.
How do I choose the right materials for my walk-in shower?
When selecting materials, consider durability, water resistance, and aesthetics. Popular choices include tiles for versatility, glass for a modern look, and stone for luxury. Ensure materials are suitable for wet environments and easy to maintain.
What are the key steps in preparing my bathroom for a walk-in shower installation?
Key preparation steps include removing old fixtures, ensuring proper waterproofing with membranes or sealants, and setting up the shower base and drain. Proper preparation is crucial for a successful and long-lasting installation.
How can I prevent leaks in my walk-in shower?
To prevent leaks, ensure proper waterproofing with a membrane or backer board, use quality sealants around joints and edges, and install the shower base and drain correctly. Regularly check for any signs of leaks and address them promptly.
What maintenance is required for a walk-in shower?
Regular maintenance includes cleaning with non-abrasive cleaners, checking for leaks, and re-sealing grout and caulking as needed. Keep the shower area dry and well-ventilated to prevent mold and mildew growth.
Maintaining a clean and hygienic walk-in shower is essential for its longevity and your comfort. Regular cleaning helps prevent mold, mildew, and soap scum buildup, ensuring a fresh and inviting space. For optimal care, clean your shower with non-abrasive cleaners and check for any leaks or damage periodically.
To complement your shower maintenance routine, it’s important to consider your personal hygiene needs. You might find the Shower Frequency Guide useful in determining how often you should shower based on various factors like activity level and skin type. Proper showering habits not only contribute to your overall well-being but also affect how frequently you’ll need to clean and maintain your shower.
For more tips on maintaining your walk-in shower and enhancing your bathroom experience, check out the full guide linked above.
Credit Website: www.ireland.ie/